Fork me on GitHub

React学习笔记

文章概述

本篇文章是React学习笔记。

创建react项目

创建新的react项目

这种方式创建的react项目,已经为你配置好了Babel和webpack,你可以零配置使用,这种方式灵活性不好,所有的配置都自动被配置好了

需要Node >= 6, 按如下步骤:

1
2
3
4
5
6
7
8
//1.安装创建项目插件:
npm install -g create-react-app
//2.创建项目:
create-react-app my-app

cd my-app
//3.启动项目:
npm start

在已有项目中添加react

初始化config.json文件,安装react和react-dom库即可支持react开发,为了更好的开发效率,建议使用webpack配置babel-loader来支持ES6和JSX语法

默认安装最新版,注意react相关库应保持版本一致;

  • 通过Yarn安装React:
1
2
yarn init
yarn add react react-dom
  • 通过npm安装React:
1
2
npm init
npm install --save react react-dom

JSX

JSX是对JavaScript语法的扩展,具有JavaScrip的全部能力,JSX可以生成React“元素”。

JSX概述

JSX可以直接使用html的写法,如下就可以看做一个JSX表达式:

1
const element = <h1>Hello, world!</h1>;

表达式写法规则

  • jsx表达式写在{}里,可以用花括号{}把任意的JavaScript表达式嵌入到JSX中。
  • JSX本身其实也是一种表达式,可以在if语句或者是for循环中使用JSX:
1
2
3
4
5
6
function getGreeting(user) {
if (user) {
return <h1>Hello, {formatName(user)}!</h1>;
}
return <h1>Hello, Stranger.</h1>;
}
  • 组件命名:大写字母开头。
1
const SpecificStory = ...;
  • 属性名:使用camelCase小驼峰命名来定义组件属性的名称,包括html模板里的标签属性名。
  • JSX中用点表示法来引用组件:
1
2
// 引用MyComponents模块中的DatePicker组件
<MyComponents.DatePicker color="blue" />;

属性值

概念:标签内部设置的成员值;

属性赋值方式
  1. 使用引号来定义以字符串为值的属性:
1
const element = <div tabIndex="0"></div>;
  1. 使用花括号{}来定义以JavaScript表达式为值的属性:
1
const element = <img src={user.avatarUrl}></img>;
1
2
3
//使用...作为扩展操作符来传递属性对象:
const props = {firstName: 'Ben', lastName: 'Hector'};
return <Greeting {...props} />;

模板样式

jsx语法定义的html模板用括号()括起来,可以防止编辑工具自动在行尾加分号;

给标签元素设置样式,有两种方式:

  1. 通过给标签的style属性指定一个样式对象;
  2. 使用css样式文件集中管理样式;
指定样式对象

给jsx语法定义的html模板内的标签,添加style属性,属性值设置为一个样式对象:

1
2
3
4
5
6
7
8
9
10
let x_style = {
color: 'b'+'lue' //允许样式带逻辑
};

let jsx = (
<div>
<h1 style={styles}>Hello, world!</h1>
<h3 style={{color:'yellow'}}>Hello, world!</h3>
</div>
);
特点
  • 允许样式值带逻辑语句;
  • 样式对象属性名是用驼峰式命名,没有使用css里的中横杠;
CSS样式文件
  1. 定义样式文件x.css:
1
2
3
4
5
6
7
#jsxId {
color: blue;
}

.jsxClass {
color: yellow;
}
  1. jsx文件中导入样式文件使用:
1
2
3
4
5
6
7
import './x.css';
let jsx = (
<div>
<h1 id="jsxId">Hello, world!</h1>
<h1 className="jsxClass">Hello, world!</h1>
</div>
);

JSX语法

变量使用

1
2
3
4
5
6
let name='jason';
let jsx = (
<div>
<p>I am {name}</p>
</div>
);

条件表达式

if语句

if不能嵌入在{}里面

1
2
3
4
5
if (bool) {
// ...
} else {
// ...
}
与运算符

&&

概述

在 JavaScript 中,true && expression 总是返回 expression,而 false && expression 总是返回 false。

使用

可以通过用花括号{}包裹代码在 JSX 中嵌入‘与运算’表达式。

示例:

1
{1 > 0 && <h2>hello</h2>}
三目运算符
表达式
1
condition ? true : false
使用示例
1
2
3
4
5
6
7
8
9
let flag = false;
let name = 'jason';
let jsx = (
<div>
{
flag ? <p>I am {name}</p> : <p>I am not {name}</p>
}
</div>
);

循环方法

通过map方法遍历数组生成列表:

1
2
3
4
5
6
7
8
let names = ['Jason', 'Lily', 'Simon'];
let jsx = (
<div>
{
names.map((name, index) => <p key={index}>hello, I am {name}</p>)
}
</div>
);

元素

概念

元素是构成React应用的最小单位,用来描述你在屏幕上看到的内容。

1
2
// 定义一个元素
const element = <h1>Hello, world</h1>;

与浏览器的DOM元素不同,React中的元素事实上是普通的对象,React DOM可以确保 浏览器DOM的数据内容与React元素保持一致。

注意:元素事实上只是构成组件的一个部分。

根节点

用React开发应用时一般只会定义一个根节点。但如果你是在一个已有的项目当中引入 React的话,你可能会需要在不同的部分单独定义React 根节点。

在react项目的public/index.html中,id=”root”的div作为项目的根节点,根节点的内容由React Dom来管理。

1
<div id="root"></div>

元素的渲染

一般通过src/index.js中的ReactDOM.render()方法将React元素渲染到根节点。

如下:将定义好的App渲染到根节点。

1
2
3
4
ReactDOM.render(
<App/>,
document.getElementById('root')
);

组件

概念

组件从概念上看就像是函数,它可以接收任意的输入值(称之为“props”),并返回一个需要在页面上展示的React元素。

组件的定义

  • 类定义的组件名或者定义组件的函数名,必须以大写字母开头。
函数定义组件

使用JavaScript函数定义一个组件:

1
2
3
function Welcome(props) {
return <h1>Hello, {props.name}</h1>;
}

该函数是一个有效的React组件,它接收一个单一的“props”对象并返回了一个React元素。

ES6类定义组件
1
2
3
4
5
6
7
// 继承自Component组件类
class Welcome extends React.Component {
// render方法返回一个渲染结果
render() {
return <h1>Hello, {this.props.name}</h1>;
}
}

React 组件也可以通过数组的形式返回多个元素:

1
2
3
4
5
6
7
8
9
render() {
// 不需要使用额外的元素包裹数组中的元素
return [
// 不要忘记 key
<li key="A">First item</li>,
<li key="B">Second item</li>,
<li key="C">Third item</li>,
];
}

组件的渲染

元素也是一个组件,自定义组件通过render()方法返回渲染出的界面。

阻止组件渲染

阻止组件渲染,让View、组件或组件的render方法返回null,而不是它的渲染结果即可实现。

示例:

1
2
3
4
5
6
7
8
9
10
11
12
13
14
15
// 组件函数
function ShowWidget(props) {
if (!props.isShow) {
return null;
}

return (
<div className="isShow">
显示
</div>
);
}

// 使用组件时
<ShowWidget isShow={this.state.isShow} />

注意:
阻止组件的渲染,并不会影响该组件生命周期方法的回调。
例如,componentWillUpdate 和 componentDidUpdate 依然可以被调用。

props

组件的属性

概念
  • props是一种从父级向子级传递数据的方法;
  • 使用时组件内部只能读父组件的属性值,组件不能改变props;
属性的种类
继承父组件属性
1
2
3
4
5
class MyComponent extends React.Component{
constructor(props){
super(props);
}
}
默认属性

create-react-app创建的项目支持这种写法

1
2
3
4
5
// 定义默认属性
static defaultProps={
name:'张三(默认名字)',
age:20
}

props类型检查

主要对props的属性进行类型检查。

注意: React.PropTypes 自 React v15.5 起已弃用。请使用 prop-types 库代替。

1
2
// 命令安装prop-types库到node_modules内,并添加到package.json中
$ npm install --save prop-types
使用方式

给props成员设置类型约束

1
2
3
4
5
6
7
8
9
10
11
12
13
14
15
import PropTypes from 'prop-types';

// 写在组件类内部
static propTypes={
name:PropTypes.string,
age:PropTypes.number,
sex:PropTypes.string.isRequired //必须的
}

// 写在组件类外部
MyClass.propTypes={
name: PropTypes.number
// isRequired必须的
id: PropTypes.number.isRequired
}
常见约束类型

约束类型都在PropTypes模块中

1
2
3
4
5
6
7
8
9
10
11
12
13
14
15
16
17
18
19
20
var ReactPropTypes = {
array: shim,
bool: shim,
func: shim,
number: shim,
object: shim,
string: shim,
symbol: shim,

any: shim,
arrayOf: getShim,
element: shim,
instanceOf: getShim,
node: shim,
objectOf: getShim,
oneOf: getShim,
oneOfType: getShim,
shape: getShim,
exact: getShim
};
常用类型约束写法
1
2
3
4
5
6
7
8
9
10
11
12
13
14
15
16
17
18
19
20
21
22
23
24
25
26
27
28
29
30
31
32
33
34
35
36
37
38
39
40
41
42
43
44
45
46
47
48
49
50
51
52
53
54
55
56
57
58
59
60
61
62
63
64
65
66
67
68
69
70
71
72
73
74
75
76
import PropTypes from 'prop-types';

MyComponent.propTypes = {
// 你可以将属性声明为以下 JS 原生类型
optionalArray: PropTypes.array,
optionalBool: PropTypes.bool,
optionalFunc: PropTypes.func,
optionalNumber: PropTypes.number,
optionalObject: PropTypes.object,
optionalString: PropTypes.string,
optionalSymbol: PropTypes.symbol,

// 任何可被渲染的元素(包括数字、字符串、子元素或数组)。
optionalNode: PropTypes.node,

// 指定只传递一个子代,即一个 React 元素
optionalElement: PropTypes.element,

// 你也可以声明属性为某个类的实例,这里使用 JS 的
// instanceof 操作符实现。
optionalMessage: PropTypes.instanceOf(Message),

// 你也可以限制你的属性值是某个特定值之一
optionalEnum: PropTypes.oneOf(['News', 'Photos']),

// 限制它为列举类型之一的对象
optionalUnion: PropTypes.oneOfType([
PropTypes.string,
PropTypes.number,
PropTypes.instanceOf(Message)
]),

// 一个指定元素类型的数组
optionalArrayOf: PropTypes.arrayOf(PropTypes.number),

// 一个指定类型的对象
optionalObjectOf: PropTypes.objectOf(PropTypes.number),

// 一个指定属性及其类型的对象
optionalObjectWithShape: PropTypes.shape({
color: PropTypes.string,
fontSize: PropTypes.number
}),

// 你也可以在任何 PropTypes 属性后面加上 `isRequired`
// 后缀,这样如果这个属性父组件没有提供时,会打印警告信息
requiredFunc: PropTypes.func.isRequired,

// 任意类型的数据
requiredAny: PropTypes.any.isRequired,

// 你也可以指定一个自定义验证器。它应该在验证失败时返回
// 一个 Error 对象而不是 `console.warn` 或抛出异常。
// 不过在 `oneOfType` 中它不起作用。
customProp: function(props, propName, componentName) {
if (!/matchme/.test(props[propName])) {
return new Error(
'Invalid prop `' + propName + '` supplied to' +
' `' + componentName + '`. Validation failed.'
);
}
},

// 不过你可以提供一个自定义的 `arrayOf` 或 `objectOf`
// 验证器,它应该在验证失败时返回一个 Error 对象。 它被用
// 于验证数组或对象的每个值。验证器前两个参数的第一个是数组
// 或对象本身,第二个是它们对应的键。
customArrayProp: PropTypes.arrayOf(function(propValue, key, componentName, location, propFullName) {
if (!/matchme/.test(propValue[key])) {
return new Error(
'Invalid prop `' + propFullName + '` supplied to' +
' `' + componentName + '`. Validation failed.'
);
}
})
};
静态类型检查
  • 像Flow和TypeScript这样的静态类型检查器可以在运行代码之前识别某些类型的问题。
  • 对于大的项目建议使用Flow或者TypeScript来替代PropTypes。

state

状态;

概念
  • 状态与属性十分相似,但是状态是私有的,完全受控于当前组件。
  • 对于组件,state是可变的,一般通过改变state来刷新组件。
  • State 只在交互的时候使用,即随时间变化的数据。
state的定义
1
2
3
4
// 方法1:默认静态成员声明;
state = {
size: 80
}
1
2
3
4
5
6
7
// 方法2:构造器中定义;
constructor(props) {
super(props);
this.state={
size:80
};
}
1
2
3
4
5
6
7
// 方法3:构造器中定义;
constructor(props) {
super(props);
this.state=({
size:80
});
}
改变state
1
2
3
4
// 一般写法
this.setState({
comment: 'Hello'
});
1
2
3
4
5
6
7
8
9
10
11
12
// 接受一个函数,参数1:先前的状态;参数2:props
// 常规函数形式
this.setState(function(prevState, props) {
return {
counter: prevState.counter + props.increment
};
});

// 箭头函数形式
this.setState((prevState, props) => ({
counter: prevState.counter + props.increment
}));
state异步改变

在react中设置state后,state的更新时异步执行的,如果想state更新后立即执行某些逻辑,可以为setState方法添加第二个参数,setState的第二个参数使用一个匿名函数作为异步跟新后的处理函数;

示例:

1
2
3
4
5
this.setState({
myState: true
}, ()=> {
//...状态更新后需要立即处理的逻辑;
})

事件的处理

  • 事件名称首字母小写的驼峰式命名法;
  • 事件需要一个处理函数/方法(类中);
阻止链接打开页面

注:# 表示无效链接

  • 传统的HTML中:通过处理函数返回false来阻止打开默认页面;
1
2
3
<a href="https://www.baidu.com/" onclick="console.log('The link was clicked.'); return false">
Click me
</a>
  • react中通过调用e.preventDefault()方法来阻止打开默认页面;
1
2
3
4
5
6
7
8
9
10
11
12
13
14
render() {
return (
<div className="App">
<a href="https://www.baidu.com/" onClick={this.handleClick}>
Click me
</a>
</div>
);
}

handleClick(e) {
// e作为一个事件对象,通常放在参数后面
e.preventDefault();
}
监听事件的绑定
  • 在ES6中,方法不再自动绑定this,需要手动bind,并且每次bind都会返回一个新的引用。
  • 使用箭头函数或者构造器绑定的方法可以为事件方法绑定this;
在构造器中绑定this
1
2
3
4
5
6
7
8
9
10
11
12
13
14
15
16
17
18
19
20
21
22
23
24
class Parent extends React.Component {
constructor(props) {
super(props);
this.state = ({
count: 0
});
this.handleClick=this.handleClick.bind(this);
}

handleClick(){
this.setState({
count: this.state.count+1,
});
}

render() {
return (
<div>
<button onClick={this.handleClick}>click me</button>
<lable>click count {this.state.count}</lable>
</div>
);
}
}
箭头函数绑定this

使用箭头函数在定义的时候就绑定好了this指针:即this.event=event;

方式一:在方法调用的地方使用箭头函数:

1
2
3
4
5
6
7
8
9
10
11
12
13
14
15
16
17
18
19
20
21
22
23
class Parent extends React.Component {
constructor(props) {
super(props);
this.state = ({
count: 0
});
}

handleClick(){
this.setState({
count: this.state.count+1,
});
}

render() {
return (
<div>
<button onClick={(e) => this.handleClick(e)}>click me</button>
<lable>click count {this.state.count}</lable>
</div>
);
}
}

方式二:在方法声明时,使用箭头函数声明,调用时用this直接调用:

1
2
3
4
5
6
7
8
9
//定义方法时:使用箭头函数返回箭头函数的方式定义;
checkColorType= value=>()=>{
this.setState({
colorValue: value,
});
};

//调用时:直接使用this调用即可;
onClick={this.checkColorType(x)}

生命周期钩子

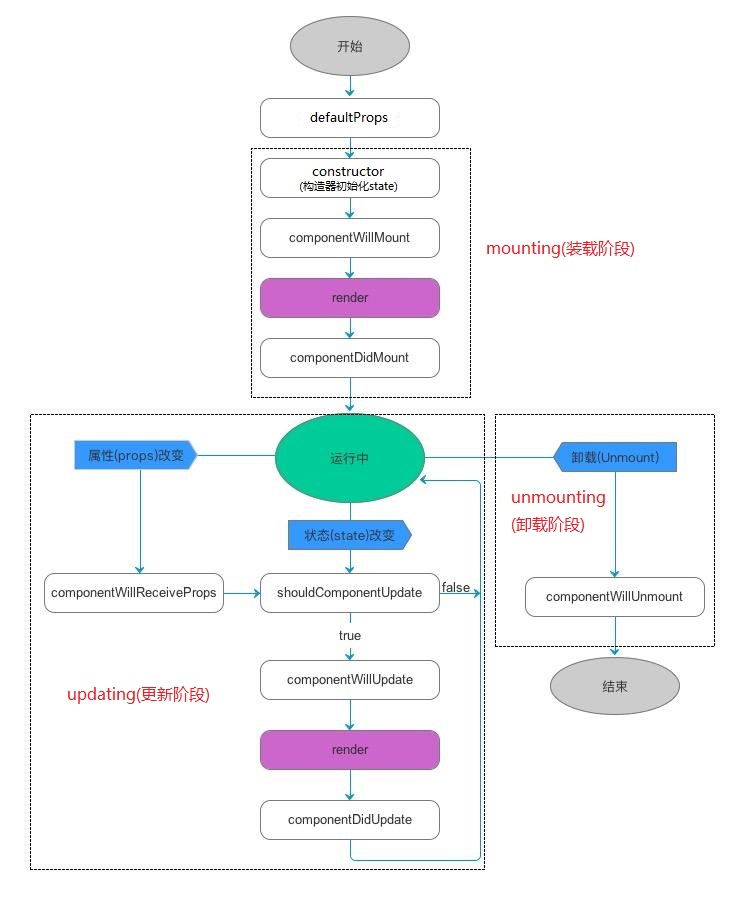
生命周期方法调用图

react声明周期图如下:
image

触发生命周期方法调用示例

代码如下:

1
2
3
4
5
6
7
8
9
10
11
12
13
14
15
16
17
18
19
20
21
22
23
24
25
26
27
28
29
30
31
32
33
34
35
36
37
38
39
40
41
42
43
44
45
46
47
48
49
50
51
52
53
54
55
56
57
58
59
60
61
62
63
64
65
66
67
68
69
70
71
72
73
74
75
76
77
78
79
80
81
82
83
84
85
86
87
88
89
90
91
92
93
94
95
96
97
98
99
100
101
class MyComponent extends React.Component {
//设置默认属性(仅初始化设置一次)
static defaultProps={
data: 'default data'
};

constructor(props) {
super(props);
console.log('-------constructor-------');
this.state = ({
message: 'null'
});
}

//将要装载组件
componentWillMount() {
console.log('-------componentWillMount-------');
}

//组件装载完毕
componentDidMount() {
console.log('-------componentDidMount-------');
}

//将要接收父组件传来的props
componentWillReceiveProps(nextProps, nextContext) {
console.log('-------componentWillReceiveProps-------');
}

//是否应该更新组件(默认更新)
shouldComponentUpdate(nextProps, nextState, nextContext) {
console.log('-------shouldComponentUpdate-------');
return true;
}

//组件将要更新
componentWillUpdate(nextProps, nextState, nextContext) {
console.log('-------componentWillUpdate-------');
}

//组件更新完毕
componentDidUpdate(nextProps, nextState, nextContext) {
console.log('-------componentDidUpdate-------');
}

//渲染组件
render() {
console.log('-------render-------');
return (
<div>
Hello World
</div>
);
}

//卸载组件
componentWillUnmount() {
console.log('-------componentWillUnmount-------');
}
}

class App extends React.Component {
constructor(props) {
super(props);
this.state = {
data: 'old props',
isShow: true
}
}

//改变属性,触发子组件属性改变
changeData() {
this.setState({
data: "new props"
});
}

//卸载子组件
destroyChildComponent() {
this.setState({
isShow: false
});
}

render() {
return (
<div>
{
this.state.isShow ? <MyComponent data={this.state.data}/> : null
}
<button onClick={() => this.changeData()}>改变props</button>
<button onClick={() => this.destroyChildComponent()}>卸载子组件</button>
</div>
);
}
}

ReactDOM.render(
<App/>,
document.getElementById('app')
);

组件间的组合关系

纯组件嵌套

直接嵌套组件使用:

1
2
3
4
5
6
7
8
9
10
11
12
13
14
15
16
17
18
19
20
21
22
23
24
25
26
27
28
29
30
31
32
class Child extends React.Component {
constructor(props) {
super(props);
}

render() {
return (
<div>
hello I am {this.props.name}
</div>
);
}
}

class Father extends React.Component {
constructor(props) {
super(props);
}

render() {
return (
<div>
<Child name="张三"/>
</div>
);
}
}

ReactDOM.render(
<Father/>,
document.getElementById('app')
);
子代容器组件
  • 组件中利用props(props.children)传递子内容或标签内容;
  • 组件开始和结束标签的JSX 表达式中,标记之间的内容作为子代(子内容)。使用{props.children}作为子代内容的占位。
示例
1
2
3
4
5
6
7
8
9
10
11
12
13
14
15
16
17
18
19
20
21
22
23
24
25
26
27
28
29
30
31
32
33
34
35
36
37
38
39
40
41
42
43
class A extends React.Component {
render() {
return (
<div>
Component A
</div>
);
}
}

class B extends React.Component {
render() {
return (
<div>
Component B
</div>
);
}
}

class Wrapper extends React.Component {
constructor(props) {
super(props);
this.state = {}
}

render() {
return (
<div>
{this.props.children}
</div>
);
}
}

ReactDOM.render(
<Wrapper>
<p>子内容嵌套</p>
<A/>
<B/>
</Wrapper>,
document.getElementById('app')
);
子代内容类型
  1. 字符串常量:
1
<MyComponent>Hello world!</MyComponent>
  1. JSX组件标签
1
2
3
4
<MyContainer>
<MyFirstComponent />
<MySecondComponent />
</MyContainer>
  1. JavaScript 表达式

通常情况下,插入 JSX 中的 JavsScript 表达式将被认作字符串、React 元素或这些内容的列表。

1
2
3
4
5
6
// 以下两个等价
<MyComponent>foo</MyComponent>
<MyComponent>{'foo'}</MyComponent>

// 混合类型使用
<div>Hello {props.addressee}!</div>;
1
2
3
4
5
6
7
8
9
10
11
12
13
// 渲染任意长度的 JSX 表达式的列表很有用
function Item(props) {
return <li>{props.message}</li>;
}

function TodoList() {
const todos = ['finish doc', 'submit pr', 'nag dan to review'];
return (
<ul>
{todos.map((message) => <Item key={message} message={message} />)}
</ul>
);
}
  1. 函数

利用props.children 来获得传递的子代:

1
2
3
4
5
6
7
8
9
10
11
12
13
14
15
function Repeat(props) {
let items = [];
for (let i = 0; i < props.numTimes; i++) {
items.push(props.children(i));
}
return <div>{items}</div>;
}

function ListOfTenThings() {
return (
<Repeat numTimes={10}>
{(index) => <div key={index}>This is item {index} in the list</div>}
</Repeat>
);
}
  1. 布尔值、Null 和 Undefined 被忽略
  • false、null、undefined 和 true 都是有效的子代,但它们不会直接被渲染。

下面的表达式是等价的:

1
2
3
4
5
6
<div />
<div></div>
<div>{false}</div>
<div>{null}</div>
<div>{undefined}</div>
<div>{true}</div>
  • 如果让false、null、undefined和true输出,需要强制转成字符串:
    1
    {String(myVariable)}.

组件间通信

父组件通信子组件

父组件通过设置属性传递给子组件,子组件通过props获取父组件传递的属性;

子组件通信父组件

通过在父组件内定义回调函数,在子组件里利用props调用父组件的回调函数即可;

1
2
3
4
5
6
7
8
9
10
11
12
13
14
15
16
17
18
19
20
21
22
23
24
25
26
27
28
29
30
31
32
33
34
35
36
37
38
39
40
41
42
43
44
45
46
47
48
49
50
51
52
class ChildA extends React.Component {
constructor(props) {
super(props);
}

//子组件通过调用父组件传递来的changeParentMsg属性,来调用父组件的改变状态的方法
changeParentMsg(){
this.props.changeBMsg('A is changing message');
}

render() {
return (
<div id="childFrame">
<label>childA</label>
<br/>
<button onClick={()=>this.changeParentMsg()}>click me</button>
</div>
);
}
}

class Parent extends React.Component {
constructor(props) {
super(props);
this.state = ({
message: 'null'
});
}

changeBMsg(msg) {
this.setState({
message: msg,
});
}

render() {
return (
<div id="parentFrame">
<lable>parent</lable>
<br/>
<label>message : {this.state.message}</label>
{/*父组件定义属性绑定方法*/}
<ChildA changeBMsg={msg => this.changeBMsg(msg)}/>
</div>
);
}
}

ReactDOM.render(
<Parent/>,
document.getElementById('app')
);
兄弟组件通信

通过状态提升进行兄弟组件通信;

状态提升

子组件A通讯传给父组件,改变父组件的state,父组件再讲state传给兄弟组件;(这种方式为了在兄弟组件中传递数据,把数据放到了父组件里,这种方式叫状态提升)

示例
1
2
3
4
5
6
7
8
9
10
11
12
13
14
15
16
17
18
19
20
21
22
23
24
25
26
27
28
29
30
31
32
33
34
35
36
37
38
39
40
41
42
43
44
45
46
47
48
49
50
51
52
53
54
55
56
57
58
59
60
61
62
63
64
65
66
class ChildA extends React.Component {
constructor(props) {
super(props);
}

//子组件通过调用父组件传递来的changeParentMsg属性,来调用父组件的改变状态的方法
changeParentMsg(){
this.props.changeBMsg('A is changing message');
}

render() {
return (
<div id="childFrame">
<label>childA</label>
<br/>
<button onClick={()=>this.changeParentMsg()}>click me</button>
</div>
);
}
}

class ChildB extends React.Component {
render() {
return (
<div id="childFrame">
<label>childB</label>
<br/>
<label>message : {this.props.message}</label>
</div>
);
}
}

class Parent extends React.Component {
constructor(props) {
super(props);
this.state = ({
message: 'null'
});
}

changeBMsg(msg) {
this.setState({
message: msg,
});
}

render() {
return (
<div id="parentFrame">
<lable>parent</lable>
<br/>
<label>message : {this.state.message}</label>
{/*父组件定义属性绑定方法*/}
<ChildA changeBMsg={msg => this.changeBMsg(msg)}/>
<br/>
<ChildB message={this.state.message}/>
</div>
);
}
}

ReactDOM.render(
<Parent/>,
document.getElementById('app')
);

原生APP交互

原生APP调用React

原生APP调用React中的方法时,React的方法需要提升到window才能被正常调用,因为react只是js模板语法库,不能像原生js那样使用;

具体实现如下:

  1. 原生应用中调用js方法;
1
2
//android WebView调用react的方法并传递参数
mWebView.loadUrl("javascript:callJS('hello')");
  1. react中定义方法由原生调用;
1
2
3
4
5
6
7
8
9
10
11
12
13
14
15
16
17
18
19
20
//react中方法被原生调用
import React, {Component} from 'react';
export default class Test extends Component {
//定义需要被原生调用的方法
callJS(sessionid){
alert('sessionid='+sessionid);
console.log("sessionid="+sessionid);
}

constructor(props) {
super(props);
//构造其中绑定方法
this.callJS = this.callJS.bind(this);
}

componentDidMount(){
//页面加载完毕后,将方法提升到window对象才能被原生调用到
window.callJS = this.callJS;
}
}
坚持原创技术分享,您的支持将鼓励我继续创作!